THE 5 STEP GUIDE TO USING THE SONY V1 CAMERA
(plus external hard drive)

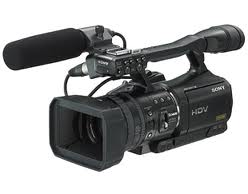
This post offers 5 simple steps on how to use the Sony V1 camera. Students should also refer to Tutorials 8 and 15 for more information about filming with the camera (pictured above).
STEP 1 – ATTACH HARD DRIVE
Slide the support bracket for the external hard drive into the camera shoe. Then carefully secure the hard drive by locking the tightening screw in place. Finally, connect one end of the fire wire cable to the hard drive, and the other to camera’s hard drive connector, which is found at the rear right of the camera.
Always ensure that the cable is clear of the camera lens.
STEP 2 – POWER UP
Powering up the camera is a simple procedure. You start by turning the power button anticlockwise to the camera position, which enables you to record video. Or, if you want to view video files, turn it clockwise to the VCR position. Wait for the camera to start up, and watch the screen until start-up messages are complete.
Next, power up the external hard drive. Push the sliding button to the right, towards the video position for camera recording and playback. You push the sliding button to the left towards the computer position when connecting to a computer to transfer recorded material. Again, watch the screen and wait for start-up to finish.
Make sure that HDV mode is on, or you will not be able to playback any HD files that you record (though you will probably record them fine…)
Back on the camera screen, ensure the iLink icon appears and is set to ‘HDV out’. If not, you will be recording only standard definition video files. Also confirm that the shutter speed is set to 1/50th of a second, which is confirmed by the number 50, just below the audio meters.
Next, check the exposure mode is set to ‘Exposure 1’, confirmed with a letter E in front of the Iris F-stop reading and the gain level. In this mode, when turning the exposure/iris dial on the side of the camera, you will be able to move from maximum iris to gain level. If it doesn’t appear on screen, you can easily toggle between manual iris and automatic exposure by pressing the ‘Exposure Iris’ button above the dial.
Focus control should always be set to manual to avoid shifting focus on busy shoots. This is confirmed on screen by the manual focus icon.
Finally, ensure the camera image quality is set to HDV 1080i, or you will only be able to record in standard definition.
STEP 3 – VIDEO SET-UP
To use the camera properly, first select manual camera operation on the top slider at the rear of the camera (that is the centred button position).
On the side of the camera, select the off position for the ND filter selection button. Use ‘ND filter 1’ when shooting video under excess lighting conditions, like shooting outdoors on a clear day. Only apply the ‘ND filter 2’ when shooting under extreme lighting conditions. Think of the ND filters as a buffer for light, like a pair of shades, allowing more control of the iris when shooting video in very bright environments.
Next thing to think about is white balance. Press the white balance button at the rear of the camera. The selected white balance mode appears on the bottom right corner of the screen. Use the select/push dial at the bottom of the rear panel of the camera to toggle between daylight and tungsten white balance settings. Remember that fluorescent lighting produces the same colour temperature as natural daylight, so it requires a daylight setting on your white balance.
On the inner panel under the LCD screen, put the zebra setting to 100% as a tool to let you adjust the overall image brightness.
STEP 4 – AUDIO SET-UP
Start by putting the camera microphone into Input 2 on the camera, as most broadcasters prefer the primary audio track on Channel 1 (your shotgun microphone or radio mics). It is very important that the ‘Record Channel Select’ switch, on the opposite side to the inputs, is set to Channel 1.
Select ‘Automatic Gain Control’ and put 48 Volts Phantom Power to the on position for Channel 2. The automatic gain control will maintain a healthy audio level for your background sound and compensate for noisy environments.
Plug your main microphone (shotgun mic or radio mics) into Input 1. Set the input to manual control for the best results. Check if the microphone needs 48 Volts Phantom Power – a shotgun mic will, radio mics will not – and if so, switch it on for Input 1 as well.
Adjust the input gain manually by monitoring the levels on the VU metres on the bottom right of the screen. Audio should average about halfway up the metres and peak about three quarters of the way up.
Also check that each microphone appears in the correct audio channel – do this by lightly tapping the microphones. Much in the same way that you monitor your video on a viewfinder or screen, always wear headphones to check the sound being recorded.
STEP 5 – FRAME UP AND SHOOT
Zoom into your subject by the maximum amount. Use the focus ring to focus on the eyes of your subject or the object being shot. When in focus, zoom back out again and adjust the exposure. Using the iris/exposure dial on the side of the camera, open the iris until the zebra pattern begins to appear. The affected area is now over 100% brightness… or overexposed. Dial back the iris until the pattern just disappears. The zebra pattern is not recorded on your video files.
Frame up your midshot or mid close-up shot for your interview. Always remember the Rule of Thirds.
Press record on the hard drive, not the camera. Remember to press the latch of the button as you slide it down. Check for the recording icon and running timecode on the external hard drive and camera screens.
You’re rolling… and for more details, click on the link below for a Sony V1 manual guide.
Good luck!